Installing the software
1. Install Container Engine
To facilitate accessing OpenFOAM in these examples, we will be using precompiled Docker images that are made available to the OpenFOAM community. This will avoid having to do a binary install and make sure that all users have the same version. (This will also make it easy to uninstall OpenFOAM by deleting the docker image.)
If you don’t have a container engine installed on your system, you will need to do that first. There are several options:
1.1 Docker container engine
On most Linux machines, the package manager includes the Docker container engine and command line interface (CLI) as standard packages. If available, this is the easiest way to install a container engine on your system.
Note that, in order to use docker, you must add yourself to the “docker” group on your machine. (And create a docker group if it is not already on your system.)
Window Subsystem for Linux (WSL)
- If you are using Windows Subsystem for Linux (WSL):
The Microsoft directions only describe installing Docker Desktop for Windows, and make no mention of installing the native linux container engine. Anecdotally, we have been told that the native container engine is problematic in WSL. To avoid a Docker Desktop subscription, you can try installing podman in WSL.
Also be sure to install the virtual GPU driver for your hardware. The download links are at https://learn.microsoft.com/en-us/windows/wsl/tutorials/gui-apps
1.2 Docker Desktop
A second alternative is Docker Desktop which is available at https://www.docker.com/products/docker-desktop/. Note that a subscription service agreement is required to use Docker Desktop and a subscription fee is required for businesses over a certain size.
1.3 Podman
A third alternative is Podman, an open source tool for creating, running, and maintaining containers and container images. It provides a CLI compatible with the Docker container engine. Podman installation instructions are at https://podman.io/getting-started/installation.
Note that, after installing Podman, you must set the podman machine “rootful” option before starting the podman machine:
> podman machine init
> podman machine set --rootful
> podman machine start
Warning
To use OpenFOAM with modelbuilder, be sure to run modelbuilder as a non-root user on your system. The OpenFOAM image uses different environments for root and non-root users, and does not run the OpenFOAM executables for root users.
2. Download modelbuilder Package
Modelbuilder release packages can be downloaded from this online folder at data.kitware.com. Find the package name for your OS; at the time of this writing, the choices are:
modelbuilder-windtunnel-centos7-221209.tar.gzfor linux machinesmodelbuilder-windtunnel-macos-arm64-11.0-221208.dmgfor macOS/ARM64 machinesmodelbuilder-windtunnel-macos-x86_64-10.14-221209.dmgfor macOS/Intel machinesmodelbuilder-windtunnel-windows-221209.zipfor Windows machines
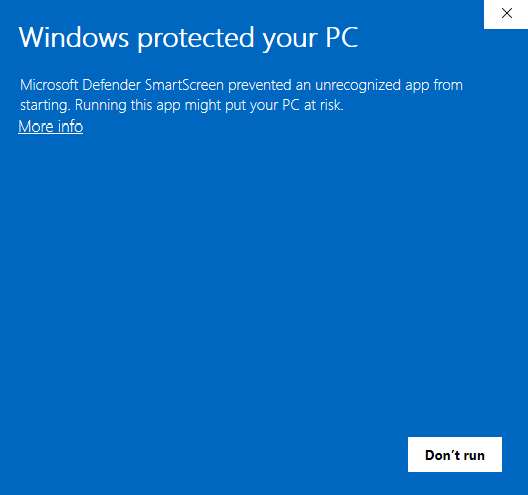
For linux and Windows machines, unpack the file in a convenient location. The modelbuilder executable is in the bin directory. When you start modelbuilder for the first time on Windows, the system will display a blue popup with the message “Windows protected your PC”. To continue, find and click the More info link, then click the Run anyway button.
For macOS machines, open the .dmg file and drag the modelbuilder application to a convenient location in your file system. You might have some popup dialogs requesting permission to access parts of your file system from the application. Be sure to answer in the affirmative.
When you first start modelbuilder, it looks similar to the ParaView desktop application, with the main differences being that (i) many of the ParaView toolbars have been hidden, and (ii) the left sidebar has two new dock widgets labeled Resources and Attribute Editor, and (iii) there is a new Wind Tunnel menu.
